Onboarding for WordPress
We no longer offer Microsoft Office 365 products at this time. If you have already purchased Microsoft Office 365, you may continue to manage your subscription through the Account Manager. If you are looking for a professional email solution, Google Workspace is an excellent alternative for a professional email and provides a full suite of productivity and communication tools.
Key Steps in Creating a WordPress Website
Domain Name and DNS
We've listed the links to smoothly guide you through the domain registration and DNS configuration process.To start any website, one must have a registered domain name.
- Registering a new domain name? See the article, How To Buy a Domain.
- Already have a domain registered with another provider and want to transfer it to us? Go to the article, How to Transfer A Domain to Your Account.
- You can also add an existing domain to your account without completely transferring its registration. Check on, How to Add a Domain.
- Want to point your domain to us for hosting? See the article, How to Update A Records.
- Need help setting up your domain pointer? Please visit, How to Setup Domain Pointers.
It is recommended to have a business email linked to your website. You can also set up an email account for your site's contact form.
Turn your every email into a viable business growth opportunity! Back to Top
WordPress Features
(Flexibility, Themes, and Plugins)
WordPress is the most flexible and sophisticated website-building platform to start a business site, blog, online store, portfolio, or anything else you can imagine.It comes with three default themes, but there is a theme directory with thousands of theme options to create a beautiful website if they aren't for you. You can also upload your theme if you wish to.
And because WordPress is known for its endless features and flexibility, there is a plugin directory with thousands of plugins for every feature not in WordPress core. You can add complex galleries, social networking, social media widgets, fine-tune controls for search engine optimization, forums, spam protection, forms, and so much more!
Back to Top
Get Started
Choose your plan.
Whether you are starting a business website, blog, online store, or portfolio, our WordPress plans got you covered! You can install WordPress on your existing hosting plan or upgrade to an optimized plan such as WP Starter and WP Essential.
WP Starter(A great place to get started)
The perfect plan for a small website or blog. |
WP Essential(Most Popular) |
| Starting at $3.75/mo * | Starting at $6.95/mo * |
|
✔️1 website
|
✔️Unlimited websites
|
|
✔️Free SSL certificate
|
✔️Free SSL certificate
|
|
✔️Free domain registration for one year
|
✔️Free domain registration for one year
|
|
✔️Unlimited storage
|
✔️Unlimited storage
|
|
✔️Unlimited bandwidth
|
✔️Unlimited bandwidth
|
|
✔️Pre-installed themes & plugins
|
✔️Pre-installed themes & plugins
|
| ✔️24/7 WordPress support |
✔️24/7 WordPress support
|
|
✔️Automatic malware removal
| |
| ✔️SiteLock professional security |
WordPress installation made easy!
Signing up for WordPress allows you to install the software automatically. As a bonus, it includes pre-installed plugins and themes to help you get rolling.
Follow these steps to get started:- Install WordPress. Visit this article for the complete guide.
- Once done with the installation process, click HERE to see how you can log in to your WordPress dashboard.
- Start creating your website! Here are some helpful links to start working on your site:
Want to learn more about WordPress? Check out our WordPress: Tutorial Videos to help you quickly understand the basics of creating a WordPress website. You can always visit WordPress.com and browse their codex or online help forums.
Back to Top
Publish Your Site
Once you're done adding all the content to your WordPress page/post, you have the option to save it as a Draft or Publish the page.A. Click on the Save Draft button to save the page. This is handy if you're not ready to publish yet and would like to come back later to add more content.
B. Click the Publish button to save your page and publish it on your website.
C. Click the Preview button to show you a preview of your page/post.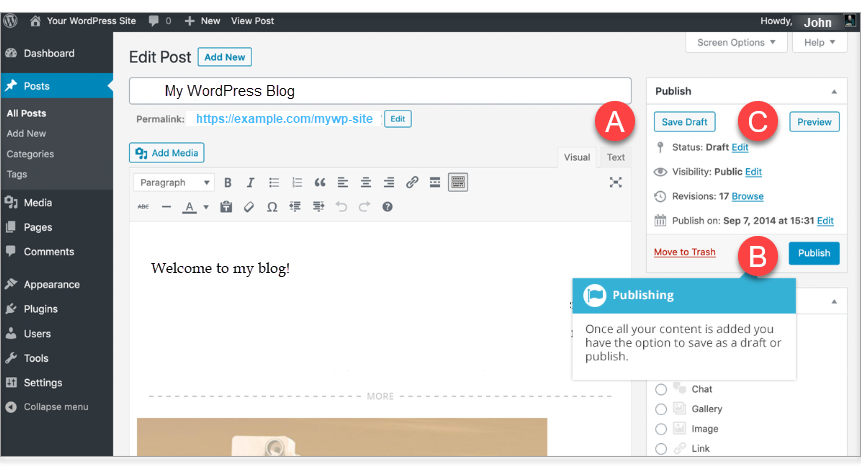
C. Click the Preview button to show you a preview of your page/post.
Other options are available when saving your WordPress Page/Post. The default status is set to Draft, which can be changed by clicking the Edit link to the right of Status: within the Publish section.
- Pending Review means you are waiting for an editor to review the Draft before publication.
- Draft means the post has not been published yet.
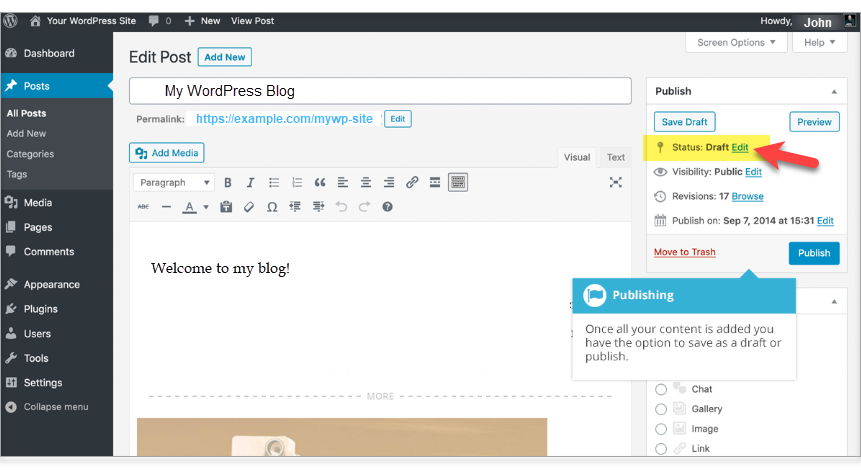
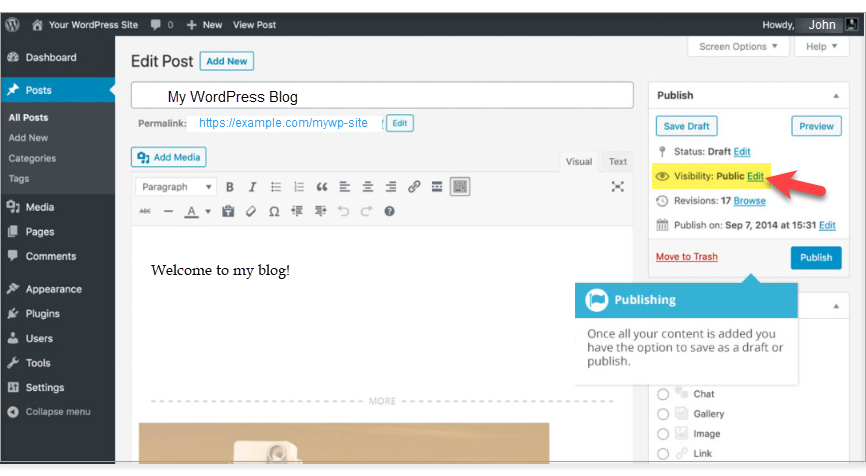
- The public is the default. It means that the page is viewable to everyone. You also have the option to make the Post 'sticky.' Sticky posts are pinned at the top of all blog posts.
- Password Protected you can assign a password to your page. Only the people who have the password will be able to access the page.
- Private hides the content from the public altogether. Regular users and visitors will not be aware of the private content.
Back to Top
.